Note: This is a project under development. The articles on this wiki are just being initiated and broadly incomplete. You can Help creating new pages.
Difference between revisions of "Ekapada Koundinyasana II"
(→Special requisites) |
|||
| Line 28: | Line 28: | ||
==Special requisites== | ==Special requisites== | ||
| + | This pose is avoided for following reasons: | ||
| + | |||
| + | * As the weight of the body falls on the wrists and the shoulders, this pose - Twisted One Legged Arm Balance pose, is to be avoided completely when there is injury. | ||
| + | * Not good when suffering at the initial stages of Carpel Tunnel Syndrome, as it would get worse. | ||
| + | * Any injury to the hips, lower back again is to be avoided. | ||
| + | * Arthritis of the wrists, arms or shoulders, should be avoided. | ||
| + | * Arm balance requires understanding of the movement of the body and its limitations, and hence this pose should not be done, when the body is not ready. | ||
| + | * As this pose is about balance, it is best to be done with guidance and help when trying it for the first time, unless one’s knowledge on yoga is vast and structured. | ||
==Initial practice notes== | ==Initial practice notes== | ||
Revision as of 09:37, 22 June 2018
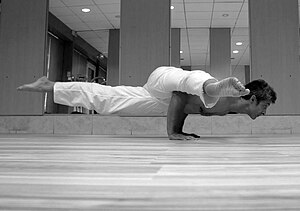
Eka Pada Koundinyasana II is an asana. In Sanskrit, Eka = One, Pada = Leg, Koundinya = Name of Sage. Sage Koundinya, was was a great scholar and believed in himself. This pose is dedicated to him, keeping in mind the faith and trust in oneself while performing this pose.
Contents
Technique
- There are many ways to get into this pose. One of the simplest is from lizard pose.
- Begin in lizard with the left leg forward. Lift your elbows off the floor by straightening your arms.
- Thread your left arm under your left leg and place your palm flat on the outside of your left foot. Try to get your left knee just over your left shoulder if possible.
- Bend both arms into a chaturanga position with the upper arms parallel to the floor.
- Begin to straighten your left leg, bringing your left thigh onto the shelf created by your upper arm. Lift your left toes from the floor.
- Shift your weight forward into your arms so that you can lift the right foot from the floor behind you, engaging your right thigh to keep that leg raised and straight.
- Keep the gaze on the floor just in front of you. You don't need to crank your neck up, but also don't let your head drop since its weight can tip you forward.
- Try to hold the posture for 5 breaths.
- Come down and try the other side.[1]
Technique in pictures/animation
Effects
- Strengthens the arms and wrists
- Strengthens the core
- Improves balance[2]
Related Asanas
Special requisites
This pose is avoided for following reasons:
- As the weight of the body falls on the wrists and the shoulders, this pose - Twisted One Legged Arm Balance pose, is to be avoided completely when there is injury.
- Not good when suffering at the initial stages of Carpel Tunnel Syndrome, as it would get worse.
- Any injury to the hips, lower back again is to be avoided.
- Arthritis of the wrists, arms or shoulders, should be avoided.
- Arm balance requires understanding of the movement of the body and its limitations, and hence this pose should not be done, when the body is not ready.
- As this pose is about balance, it is best to be done with guidance and help when trying it for the first time, unless one’s knowledge on yoga is vast and structured.
Initial practice notes
Take some time to get used to the feeling of supporting the front leg on your arm before trying to lift the back leg. If you tuck your right arm under your body so that your elbow comes roughly to your right hip, it will be easier to lift the back leg[3]
